System Specifications
- Mini PC with at least ETH 3 ports CWWK Mini PC
- 16GB RAM
- 256GB NVMe SSD
- Single-node Proxmox setup (no clustering)
- No dedicated GPU or RAID
Installation
- Step 1 – Download Proxmox VE ISO
- Step 2 – Download Rufus
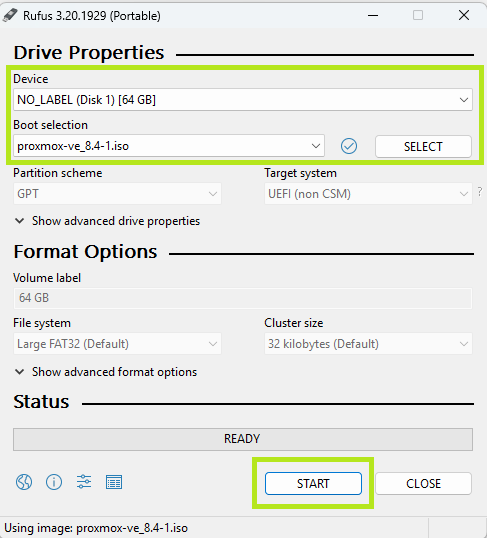
- Step 3 – Install ISO onto empty USB stick
- Step 4 – Start the Proxmox installer (UEFI mode)
- Step 5 – On the “Target Hard Disk” screen:
- Select your drive
- Then click the button labeled “Options” at the bottom-right corner of the screen
- Step 6 – In the Options Window:
- Filesystem: Choose ext4
- hdsize: Default is fine unless you want to shrink it
- swapsize: Set this to
0to disable disk swap (note: we will be enabling zram swap later). - maxroot: Leave blank unless you want to cap
/ - minfree: Optional (for snapshots or alignment)
- maxvz: Leave blank (it will use remaining space)
- Step 7 – On the Management Network Configuration screen:
- Management Interface: Choose the first port being used for your Linux Bridge (LAN)
- Hostname (FQDN): Example pve.home.arpa
- IP Address (CIDR): IP Address
- Gateway: Gateway IP address
- DNS Server: Usually the same as the Gateway
Enable Trim/Discard
Login to the PVE shell and enable Trim/discard on the root filesystem:
lvextend -l +100%FREE /dev/pve/root
resize2fs /dev/pve/root
nano /etc/fstab
Update root line to:
/dev/pve/root / ext4 discard,errors=remount-ro 0 1systemctl daemon-reload
mount -o remount /nano /etc/pve/storage.cfglvmthin: local-lvm
thinpool data
vgname pve
content rootdir,images
discard 1systemctl enable fstrim.timer
systemctl restart fstrim.timerSet up zram swap:
apt update
apt install zram-tools
nano /etc/default/zramswap
Set:
ALGO=lz4
PERCENT=13
systemctl enable zramswap
systemctl restart zramswap
swapon --showNAME TYPE SIZE USED PRIO
/dev/zram0 partition 2G 0B 100Post Install Script
bash -c "$(curl -fsSL https://raw.githubusercontent.com/community-scripts/ProxmoxVE/main/tools/pve/post-pve-install.sh)"